In today’s fast-paced world of transportation and fleet management, equipping vehicles with the latest technology is essential. An AI-powered car dash cam isn’t just a gadget—it’s a powerful tool that enhances safety, accountability, and operational efficiency. Whether you’re a business owner looking to upgrade your fleet or a manager aiming to implement new safety protocols, this step-by-step guide will walk you through the seamless installation of a car dash cam.
Why Install an AI-Powered Car Dash Cam?
Imagine having an extra set of eyes on the road, always vigilant and never blinking. That’s what an AI-powered dash cam offers:
- Enhanced Safety Monitoring: Detects and alerts for driver fatigue, distractions, or unsafe driving behaviors in real-time.
- Operational Insights: Analyzes driving patterns to optimize routes, saving time and fuel.
- Incident Documentation: Provides clear evidence in accidents or disputes, streamlining insurance claims.
- Driver Accountability: Encourages responsible driving habits through continuous monitoring.
Tools and Materials You’ll Need
Before diving into the installation, gather the following:
- AI-Powered Dash Cam Unit
- Mounting Hardware (Suction Cup or Adhesive Mount)
- Power Cable (Typically with a Cigarette Lighter Adapter or Hardwire Kit)
- Cable Management Tools (Clips, Adhesive Strips)
- Trim Removal Tool (Optional, for concealing wires)
- Fuse Tap Kit (If opting for hardwiring)
- User Manual and Installation Guide
Step-by-Step Installation Process
1. Select the Optimal Mounting Location
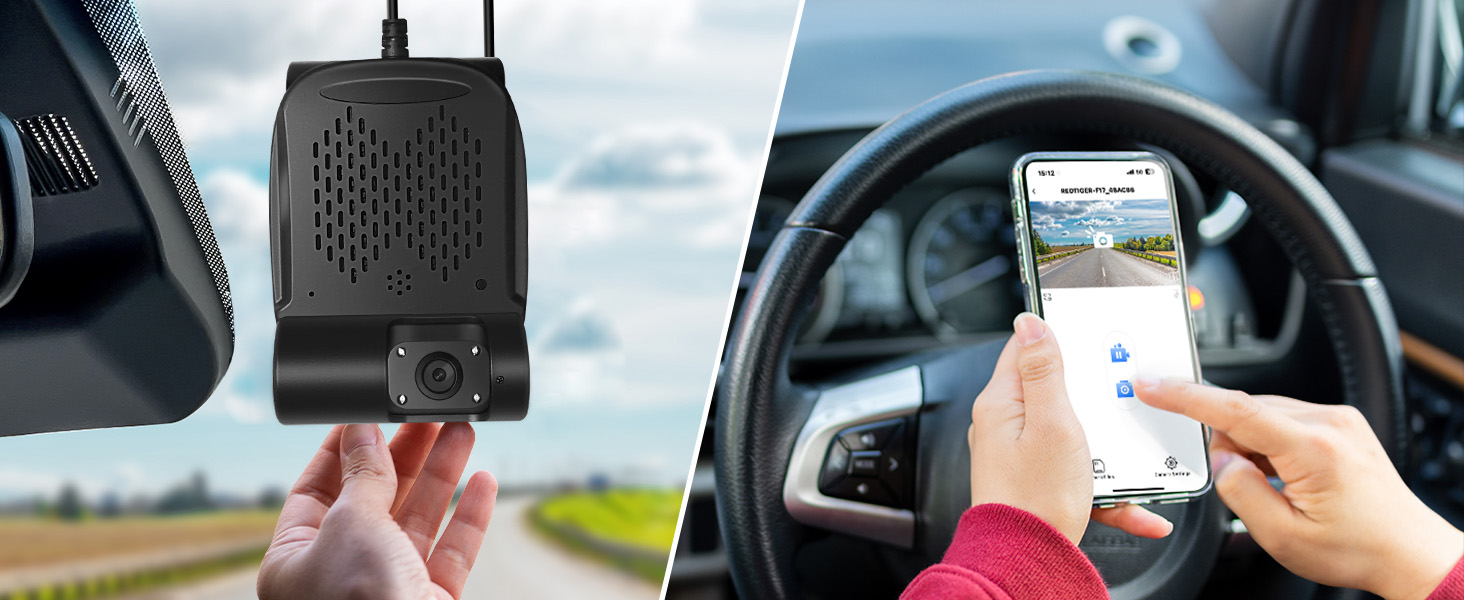
- Front Windshield Placement: Position the dash cam just behind the rearview mirror on the passenger side to ensure an unobstructed view.
- Clean the Surface: Wipe the windshield area with a lint-free cloth and alcohol-based cleaner for better adhesion.
2. Attach the Dash Cam Mount
- Install the Mount: Secure the suction cup or adhesive mount firmly to the windshield.
- Affix the Dash Cam: Slide or snap the dash cam onto the mount according to the manufacturer’s instructions.
3. Plan Your Cable Route
Think of the cabling as the veins connecting the dash cam to its power source:
- Edge Tracing: Tuck the cable into the headliner—the space between the roof and interior lining—working your way towards the A-pillar (the side of the windshield).
- Down the A-pillar: Carefully route the cable down the A-pillar towards the dashboard. Use a trim removal tool if necessary, but handle airbags with care.
- Under the Glove Box: Continue routing the cable toward the power source, keeping it concealed to prevent interference and maintain a neat appearance.
4. Connect to a Power Source
Option A: Use the Cigarette Lighter Adapter
- Plug and Play: Simply plug the adapter into the vehicle’s 12V outlet. This is the easiest method but might occupy the power socket needed for other devices.
Option B: Hardwiring to the Fuse Box
For a cleaner install and to enable features like parking mode, hardwiring is recommended.
- Locate the Fuse Box: Typically found under the dashboard or in the engine compartment.
- Identify a Suitable Fuse: Choose a fuse that corresponds to ignition-switched power (like the radio or accessory fuse) or constant power for parking mode features.
- Use a Fuse Tap: Connect the dash cam’s power cable using a fuse tap, which allows you to add a circuit without splicing wires.
- Ground the Connection: Attach the ground wire to a metal part of the vehicle’s frame using an existing bolt or screw.
5. Finalize the Installation
- Secure Loose Cables: Use cable clips or zip ties to secure any excess wiring.
- Reassemble Trim Panels: If any panels were removed, carefully put them back in place.
- Adjust the Camera Angle: Ensure the camera captures a clear view of the road ahead, with the horizon centered in the frame.
6. Configure the Dash Cam Settings
- Initial Setup: Power on the dash cam and follow on-screen prompts to set the date, time, and preferred language.
- Connect to Wi-Fi or App: If your dash cam has smartphone connectivity, pair it with your device to access settings and footage remotely.
- Enable AI Features: Activate functions like lane departure warnings, forward collision alerts, or driver fatigue monitoring as needed.
7. Test the System
- Record a Test Video: Drive around the block to capture footage and ensure the dash cam operates correctly.
- Review Footage: Check the recording for video quality, sound (if applicable), and proper functioning of AI alerts.
Tips for a Successful Installation
- Professional Assistance: For fleet-wide installations, consider hiring professional technicians to save time and ensure consistency.
- Regular Maintenance: Schedule periodic checks to update firmware and verify that all components work properly.
- Driver Training: Educate your team about the dash cam’s features and how they contribute to safety and efficiency.
Maximizing the Benefits of Your AI-Powered Dash Cam
Harness the full potential of AI technology:
- Data Integration: Sync dash cam data with fleet management software for comprehensive analytics.
- Real-Time Alerts: Set up notifications for critical events like collisions or unauthorized vehicle use.
- Driver Feedback: Use insights from the dash cam to provide constructive feedback and training to drivers.
Safety and Compliance Considerations
Just as every road has its rules, so does the use of dash cams:
- Legal Requirements: Ensure compliance with local laws regarding recording audio and video inside vehicles.
- Privacy Policies: Develop clear policies that respect driver privacy while maintaining safety standards.
- Data Security: Protect recorded data with encryption and secure storage solutions.
Common Troubleshooting
- Power Issues: If the dash cam doesn’t turn on, double-check all connections and ensure the power source is active.
- Unclear Footage: Clean the camera lens and verify settings for resolution and frame rate.
- Mount Stability: If the dash cam shakes or vibrates, reposition the mount or consider a different mounting solution.
Looking Ahead: The Future of Fleet Management
Installing AI-powered dash cams is like planting seeds for future growth. As technology evolves, these devices will offer even more sophisticated features:
- Advanced AI Analytics: Predictive maintenance alerts and enhanced driver behavior analysis.
- Integration with Autonomous Systems: Complementing semi-autonomous vehicle functions for increased safety.
- IoT Connectivity: Seamless communication with other smart devices within the vehicle ecosystem.
Conclusion
An AI-powered car dash cam is more than an accessory—it’s a strategic investment in your business’s safety, efficiency, and success. By following this guide, you’re well on your way to enhancing your fleet’s capabilities and driving your operations forward.
Ready to Elevate Your Fleet’s Performance?
As a leading manufacturer specializing in customized vehicle cameras in China, we’re dedicated to providing tailored solutions that meet your unique needs. Get in touch with us today to discover how our AI-powered dash cams can transform your business.
Further Resources
To keep the momentum going, explore these additional topics:
- Optimizing Fleet Management with AI Technology
- The Role of Dash Cams in Insurance Premium Reduction
- Comparing Different Dash Cam Models: Finding the Perfect Fit
By embracing advanced technology today, you’re steering your business toward a smarter, safer, and more prosperous future. Installation is just the first step on this exciting journey.


